SmartAppWeb (SAW) is an online portal for a framework for sensor data storage and visualization. The Internet of Things (IoT) application can use SAW to store and visualize application with HTTP-based requests. SAW currently in experimental stage, and we will like to host Internet of Things (IoT) applications on our site.
To register an application on SAW following steps are needed:
- An organization must sign on our registration page. The page requires the organization to provide some details about their intent for using our website and also a main contact.
- After a registration request is sent, it is reviewed by the administrators of page for approval. If the information is deemed reliable, then a confirmation email is sent to the address provided. This email contains the permission key for the organization.
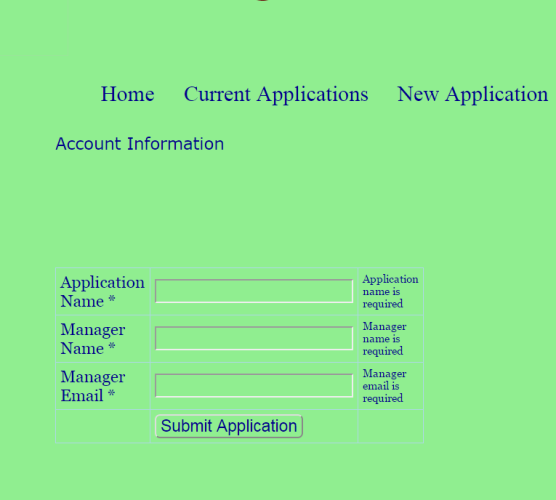
- After receiving the permission, the organization can login to their SAW account, and start new applications using the ‘New Application’ tab on the main page as shown in the picture below.
- Once an application is registered, you can view and edit it by using the "Current Applications" tab on the main page. In the following picture we see two applications registered by the same organization.
Using the forms provided on this page, you can do the following : change the information about the applications, view the data collected by these applications, view the devices used in each application,
and remove any application. The removal results in a cascaded removal of all devices, sensors and data associated with the application. Following picture shows a list of applications registered by an application.

- To add a device we have not provided a web-interface. Instead we expect the device to itself send a register request.
An example string is
GET /doRegister.php?mac=1234&appId=A99999&manager=testGuy&memail=testGuy@test.com HTTP/1.1
Four variable values must be provided:- mac --> This is the Ethernet address of the connecting device and must be provided. Duplicate registration requests for the same MAC address will be ignored.
- appId -->This is the 'Application ID' listed on the web interface for each application. This ID is unique for each application and is automatically generated. The value of 'Application ID' must be copied from the "Current Applications" page for the intended application, and provided as the value. This ensures that the application has been registered by an approved organization.
- manager --> This is the name of person responsible for the device.
- memail--> This is the manager email and will be used to send failure notices.
So the procedure for registering a device will involve the following steps:
- Make a Socket connection to www.smartappweb.com at port 80.
- Send the String "GET doRegister.php?mac=1234&appId=A99999&manager=testGuy&memail=testGuy@test.com HTTP/1.1"
- Send the remainder of HTTP header using the following lines separately
"Host: www.smartappweb.com"
"Connection: close "
“”
The last line is an empty line, needed to indicate the end of HTTP header. - A sample of Energia code used to program a CC3200 is as follows:
String http= String("GET doRegister.php?mac=macaddress&appId=A1&manager=testGuy&memail=testGuy@test.com HTTP/1.1");
// Make a HTTP request:
delay(60);
client.println(http);
client.println("Host: www.smartappweb.com");
client.println("Connection: close");
client.println();
The MAC address is determined by using one of the example codes In the Energia IDE.
- After the Device has been registered, a device permission key is issued. This key must be used with any correspondence from this device.ionio User can give Device a nickname and also record the
latitude and longitude of the device in Device's information by using the 'Save Changes' button.
The device can be viewed in on the web interface by clicking the 'Show Devices' button on 'Current Applications' page as shown the picture below.

-
After registering the device, the application can add sensors to the device. Presently only hardware sensors are allowed, but in the future we are planning to add the virtual sensors(A virtual sensor
is a combination of two or more sensors and produces the result by applyng a mathematical operation on their inputs.).
Sensors are added using the HTTP protocol. A sample of Energia code used to program a CC3200 is as follows.
String http=String("GET /addsensors.php?perm=D1234&msr=Temperature&unit=clesius&name=temp1&alert=A&thld=99.87 HTTP/1.1");
client.println(http);
client.println("Host: www.smartappweb.com");
client.println("Connection: close");
client.println();
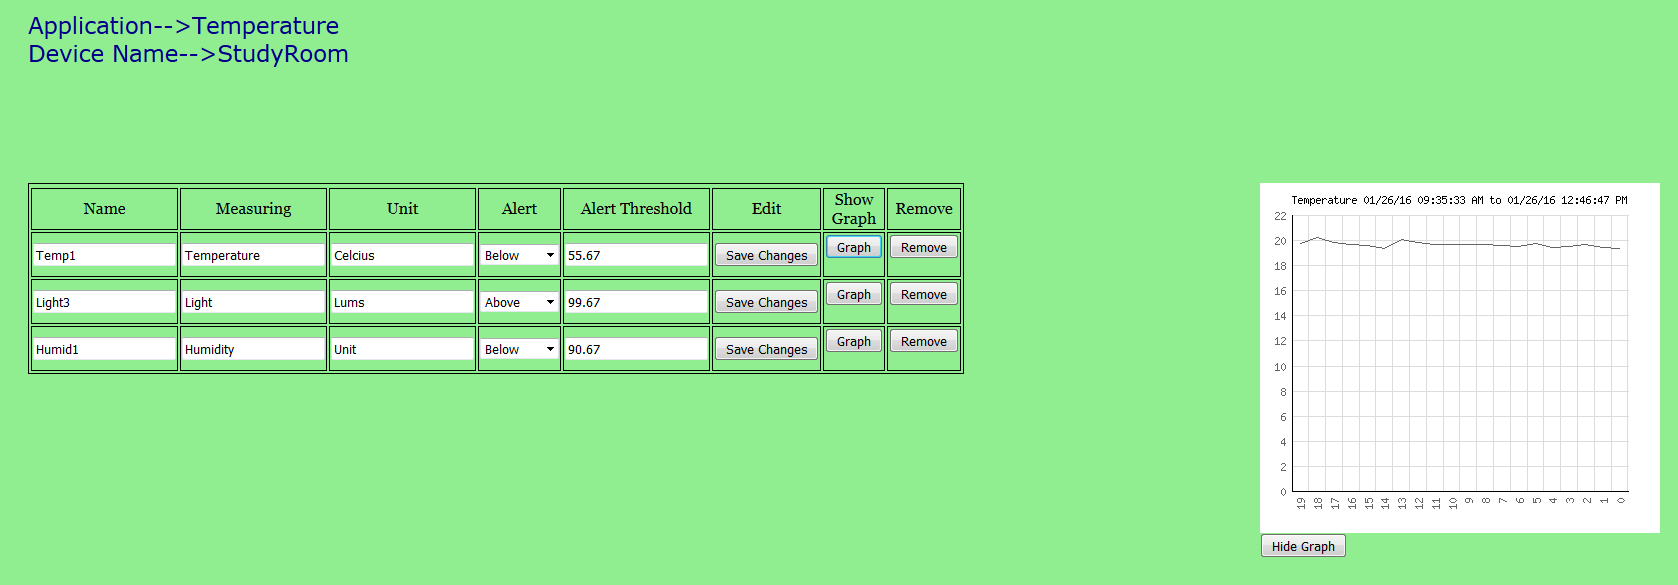
The sensors can be viewed in the web interface as shown below.
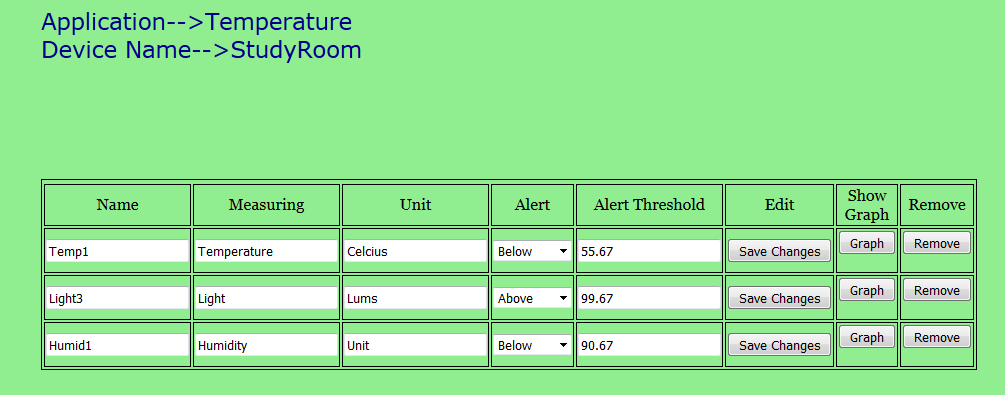
Following variables are used:- perm--> This is the unique device key and must be taken from the web interfacehere.
- msr --> This is the quantity being measured.
- unit--> This is the unit of measurement.
- name--> This must be a unique name for the sensor, if a user tries to add another sensor with the same name, the request is ignored. Sensor reading must be added using this name.
- alert-->This value signifies whether the alert should be issued or not. Valid values are :
"N" if no alerts are needed
"A" Alerts must be issued if the sensor reading is above the threshold
"B" Alerts must be issued if the sensor reading is below the threshold
"C" Alerts must be issued if the sensor value is equal to the threshold
- Data can be sent from the sensors using the HTTP protocol. The data is stored in the database. After every 15 days the data is archived into files.
If the data is not retrieved from the archived files within six months, then files are deleted to make space for the incoming data.
A sample of Energia code used to program a CC3200 is as follows
String http=String("GET /addreading.php?perm=D123&name=temp1&value=89.2 HTTP/1.1");
client.println(http);
client.println("Host: www.smartappweb.com");
client.println("Connection: close");
client.println();
Following variables are needed- perm--> This is the unique device key and must be taken from the device listing webpage. It is the same value that has been sent for perm in the addsensors request.
- name--> Is is the name of the sensor whose reading is being added
- value--> is the value of the sensor reading
- The last stage is viewing the sensor data as a graph. The last 20 readings of any sensor can be viewed by clicking the ‘View Graph” button in the sensors list.